Check the firmware version of your PIXMA PRO-1 printer
FAQ ID: L00000202
Release date: 18 June 2013
Helpful Information
How to determine your printer firmware version
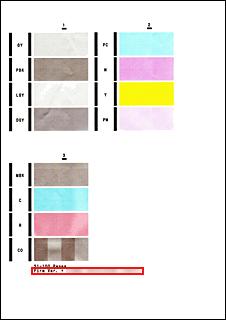
The firmware version is printed in the Nozzle Check pattern therefore please follow the procedures outlined below to perform this action.
-
Power on the printer.
-
Set one sheet of A4 plain paper in the Rear Tray as follows:
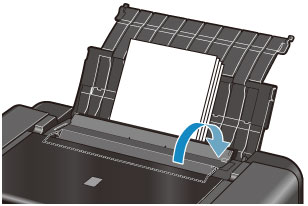
(1) Open the Paper Support of the Rear Tray.
(2) Gently open the Paper Output Tray.
IMPORTANT:
If the Inner Cover (A) is open, close it.
(3) Extend the Output Tray Extension
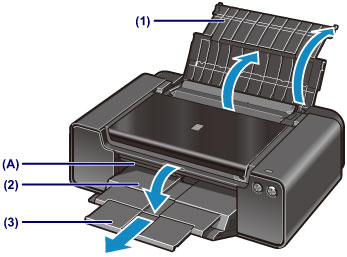
(4) Open the Feed Slot Cover.

(5) Extend the Paper Guides (B) to the end, and set a sheet of A4 plain paper in the center of the Rear Tray.
(6) Align the Paper Guides (B) to the side edge of the paper.

IMPORTANT:
• Gently align the guides to the paper. If they are too tight, the paper may not feed properly.
• Set the paper with the shorter edges at the top and bottom as shown below. If the longer edges are at the top and bottom, the paper can get jammed in the printer.
(7) Slowly close the Feed Slot Cover.
3. Press and hold the Resume/Cancel button until the Power lamp blinks twice, then release the button.

The Nozzle Check pattern will be printed. DO NOT perform anything until the printing finishes.
4. The printer firmware version is given at the bottom of the printed pattern (in the red-framed area).
For Windows
1. Make sure that the power is turned on.
2. Load a sheet of A4 or Letter-sized plain paper in the Rear Tray.
IMPORTANT
-
You cannot use the Manual Feed Tray to print the nozzle check pattern. Be sure to load paper in the Rear Tray.
3. Open the Paper Output Tray gently, and pull out the Output Tray Extension.
IMPORTANT
-
If the Inner Cover is open, close it.
* The Inner Cover is not present depending on the country or region of purchase.
4. Open the printer driver setup window.
5. Print the nozzle check pattern.
(1) Click the Maintenance tab.
(2) Click Nozzle Check.
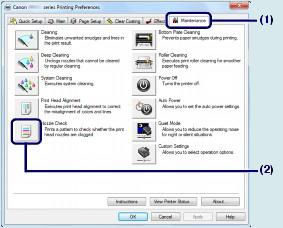
(3) Confirm the message and click Print Check Pattern, the nozzle check pattern will be printed.
*Do not perform any other operations until the printer completes the printing of the nozzle check pattern.
6. Examine the nozzle check pattern.
For Mac
1. Make sure that the power is turned on.
2. Load a sheet of A4 or Letter-sized plain paper in the Rear Tray.
IMPORTANT
-
You cannot use the Manual Feed Tray to print the nozzle check pattern. Be sure to load paper in the Rear Tray.
3. Open the Paper Output Tray gently, and pull out the Output Tray Extension.
IMPORTANT
-
If the Inner Cover is open, close it.
* The Inner Cover is not present depending on the country or region of purchase.
4. Open the Canon IJ Printer Utility.
5. Print the nozzle check pattern.
(1) Select Test Print in the pop-up menu.
(2) Click Nozzle Check.

(3) Confirm the message and click Print Check Pattern, the nozzle check pattern will be printed.
*Do not perform any other operations until the printer completes the printing of the nozzle check pattern.
6. Examine the nozzle check pattern.
Applicable Models
- PIXMA PRO-1