Sending images from a camera to an Android smartphone via an NFC connection
FAQ ID: 8202772000
Release date: 20 October 2020
Solution
Use an Android (OS version 4.0 or later) smartphone’s NFC to simplify the process of installing Camera Connect and connecting to the camera.
Operation when devices are initially connected via NFC varies depending on the camera mode when the devices are touched together.
IMPORTANT
- In the following explanation, smartphone setting procedures are indicated by the
 icon, and camera setting procedures are indicated by the
  icon.
icon. - In this article, Android™ smartphones and tablets are collectively referred to as 'smartphones'.
- When using NFC, keep the following points in mind.
- If your Camera Connect version is 2.7.10 or later, check the Android OS version of your smartphone. If the version is 10.0 or later, you cannot connect to the camera using NFC functionality.
- Avoid strong impact between the camera and smartphone. This may damage the devices.
- Depending on the smartphone, the devices may not recognize each other immediately. In this case, try holding the devices together in slightly different positions. If connection is not established, keep the devices together until the camera screen is updated.
- If you try to connect while the camera is turned off, a message may be displayed on the smartphone screen asking for the camera to be turned on. Turn the camera on again, and then touch the devices together again.
- Do not place other objects between the camera and smartphone. Also, note that camera or smartphone covers or similar accessories may block communication.
NOTE
- Connections require that a memory card be in the camera.
- Depending on the condition of the network you are using, it may take a long time to send movies. Be sure to keep an eye on the camera battery level.
- When sending movies to smartphones, note that the supported image quality varies depending on the smartphone. For details, refer to the smartphone user manual.
Confirming the OS version and installing Camera Connect
In order to connect an Android smartphone to the camera via NFC, Android™ OS version 4.0 or later and Camera Connect must be installed on the smartphone.- Procedures for confirming the OS version and installting Camera Connect are explained below.
IMPORTANT
- Interface or functions of Camera Connect are subject to change, for application improvement or update. In such a case, features of Camera Connect may differ from sample screens or operation instructions in this explanation.
- The example screen images from the smartphone are used to explain the setting procedures and may differ from the screens shown on other models. For more information on the model you are using, refer to your smartphone’s instruction manual.
- The procedure is shown on a PowerShot ELPH 190 / IXUS 180 for the purposes of explanation. The position and shape of the operation buttons, screens displayed, and setting items may differ according to the model you use.
 1. Check the smartphone’s specifications.
To confirm the Android™ OS version information, check the [Settings] menu (  )
)  [About device] [ Android version ].
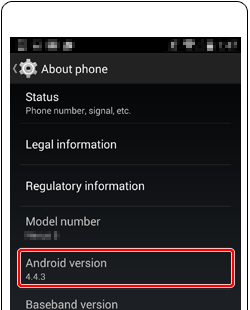
NOTE
- Turning off the sleep function of the smartphone is recommended.
2. Set [NFC] to [ON] in the smartphone’s [Settings] ( ) menu.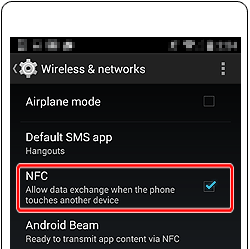
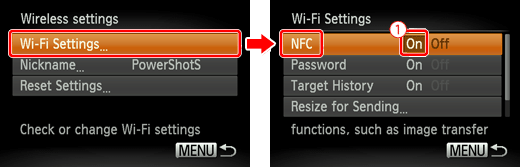
3. Press the [  ][
][  ] buttons to display [Wi-Fi Settings] from the [
  ] tab on the camera’s menu screen, and confirm that [NFC] is set to [On] (
 ). If [Off] is selected, press the [
  ] , [
] , [  ] buttons to change the setting to [On].
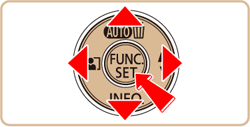
NOTE
- [NFC] is set to [On] by default.
4. After activating NFC on both devices, lightly touch the [  ] mark on the camera to the [ ] mark on the smartphone.
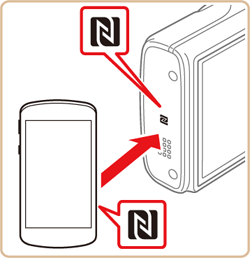
REFERENCE
- Some smartphones may not have an [ ] (N-mark). In this case, try touching the N mark on the camera to the back of the smartphone to locate the NFC touchpoint. For more information on the location of the touchpoint, please refer to the smartphone’s instruction manual.
5. Google Play™ will start up automatically on the smartphone.
When the Camera Connect download screen is displayed, touch () to begin installation.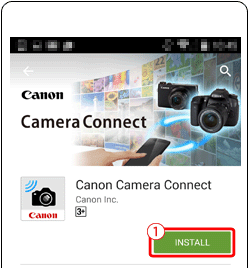
6. After installation of Camera Connect has finished, the icon shown in the example image below is displayed on the smartphone screen.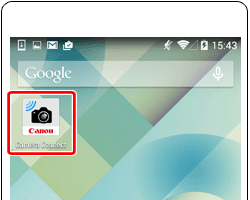
This completes the procedures for confirming the OS version and installing Camera Connect.
Operating the camera to send images
Procedures for selecting images with the camera and sending them to the smartphone are explained below.In order to send images using this method, the camera must be set to playback mode.
NOTE
- The camera does not keep a record of smartphones you connect to via NFC in Playback mode.
- You can preset images to transfer at your desired size.
- Please refer to the procedures below to select images with the camera and send them to the smartphone.
1. Press the [  ] button to turn the camera on.
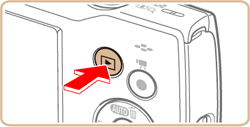

- The playback screen appears.
2. lightly touch the camera’s [ ] (N mark) to the [ ] (N mark)of a smartphone with [Camear Connect] installed.
NOTE
When Camera Connect is not installed, Google Play™ will start up and the Camera Connect download page will be displayed when you attempt to connect the camera and the smartphone via NFC. In this case, please download and install Camera Connect.
3. The camera display changes.
NOTE
- If the [Device Nickname] screen is displayed, press the [ ] , [ ] buttons to choose [OK], and then press the [
 ] button.
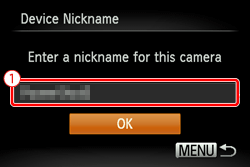
- With the default settings, the device name () is displayed.
- This nickname will be displayed on [Select a Device] screen when connecting to other devices via Wi-Fi.
- To change the camera’s nickname, press the [ ] , [ ] buttons to choose the [Nickname] field, press the [ ] button to display the keyboard, and then enter the desired nickname. After you have finished entering the nickname, press the [ MENU ] button to return to the registration screen, press the [ ] button, choose [OK], and then press the [ ] button.
4. Camera Connect starts up on the smartphone, and a connection between the smartphone and the camera is established automatically.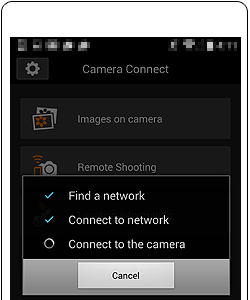
NOTE
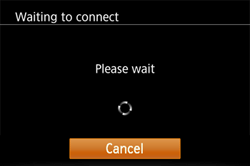
During connection, the following screen appears on the camera.
5. When the connected smartphone is recognized by the camera, the smartphones nickname ( ) will be shown for the ID when the screen below is displayed on the camera.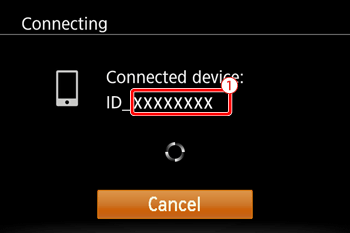
6. When a connection with the smartphone has been established, the image index screen will be displayed on the camera.
- Press the [ ] , [ ] , [ ] , [ ] to choose the desired image, and then press the [ ] button to append a [
 ].
]. - Press the [ ] button again to remove the [ ].
- Repeat the procedure explained above to select additional images.

NOTE
The smartphone cannot be operated while image selection and sending procedures are performed on the camera.
7. After you have finished selecting images, press the [MENU] button.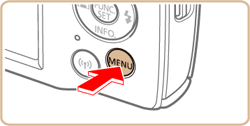
8. Press the [ ] , [ ] to choose [OK] when the following screen is displayed, and then press the [ ] button.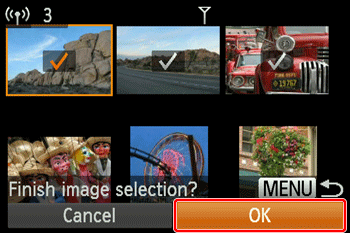
9. Press the [ ] , [ ] to choose [Send], and then press the [ ] button.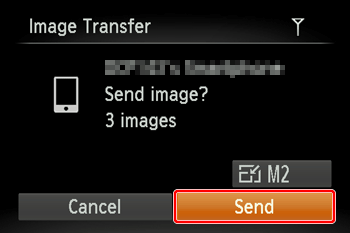
10. When image transfer is complete, [Transfer completed] will be displayed on the bottom of the screen.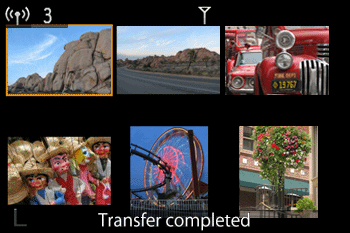
This completes the explanation of the procedures for sending images from the camera.
Operating the smartphone to send images
Procedures for confirming camera images and saving them to a smartphone are explained below.In order to save images by operating the smartphone, the camera must be set to shooting mode, or its power must be turned off.
NOTE
- When making connections using this method, remote shooting and saving location information to recorded images can also be performed.
- Once you have connected to devices via the Wi-Fi menu, recent destinations will be listed first when you access the Wi-Fi menu. Subsequent connections can be made using the Wi-Fi menu.
- Please refer to the following procedures to save images by operating the smartphone.
 1. Confirm that the camera’s power is off, or that the camera is set to shooting mode. Then, lightly touch the camera’s N mark [
  ] to the smartphone’s N mark [ ].
NOTE
When Camera Connect is not installed, Google Play™ will start up and the Camera Connect download page will be displayed when you attempt to connect the camera and the smartphone via NFC. In this case, please download and install Camera Connect.
2. The camera starts up automatically. (If the camera is set to shooting mode, the screen displayed changes.)
NOTE
- If the [Device Nickname] screen is displayed, press the [ ] , [ ] buttons to choose [OK], and then press the [ ] button.
- With the default settings, the device name () is displayed.
- This nickname will be displayed on [Select a Device] screen when connecting to other devices via Wi-Fi.
- To change the camera’s nickname, press the [ ] , [ ] buttons to choose the [Nickname] field, press the [ ] button to display the keyboard, and then enter the desired nickname. After you have finished entering the nickname, press the [ MENU ] button to return to the registration screen, press the [ ] button, choose [OK], and then press the [ ] button.
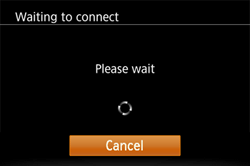
3. Camera Connect starts up on the smartphone, and a connection between the smartphone and the camera is established automatically.
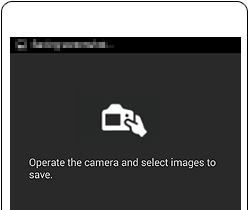
NOTE
During connection, the following screen appears on the camera.
4. When connecting for the first time, the following screen appears on the camera. In this case, press the [ ] , [ ] buttons to choose [Yes], and then press the [ ] button.
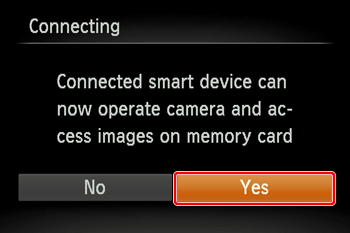
- You can now use the smartphone to browse, import, or geotag images on the camera or shoot remotely.
REFERENCE
- You can change privacy settings for registered smartphones.
5. The following screen appears.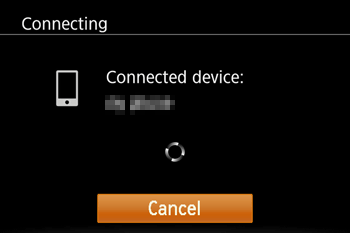
6. Once you have connected to the smartphone, a screen like the one below will appear.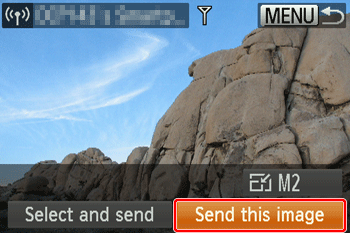
- Steps 7 to 11 explain smartphone operational procedures.
7. Touch [Images on camera ] in Camera Connect.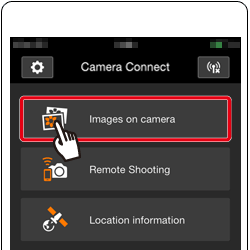
8. Tap the menu key appearing at the bottom of the screen.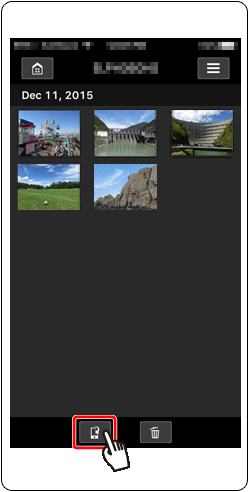
9. After the screen refreshes, choose the desired images, and then  touch [Save] on the bottom right of the screen. The selected images will be saved to the smartphone.
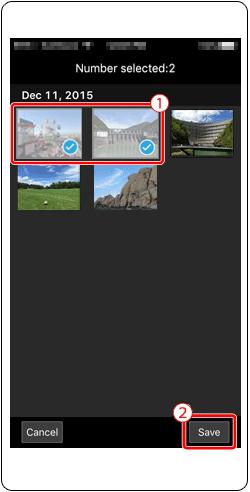
10. After the images have been saved, touch the [Home] button to return to the menu screen.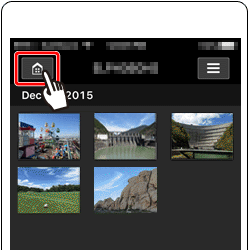
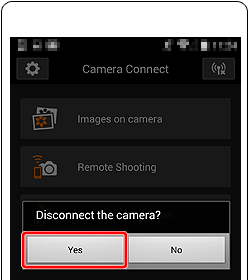
11. To end the connection, touch the [  ] icon displayed in the upper right of the screen, and then touch [Yes].
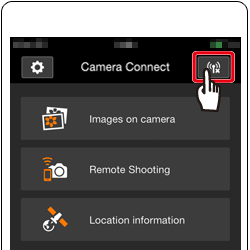

12. After the camera and smartphone have been disconnected, the following screen appears on the camera’s screen. Choose [OK], and then press the [ ] button.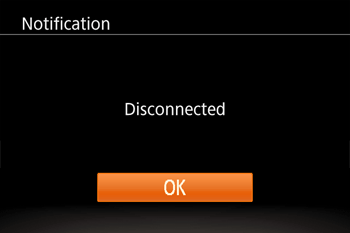
This concludes the explanation of the procedures for operating the smartphone to send images.
*Android™, and Google Play™ are trademarks of Google Inc.
Related information
Applicable Models
- IXUS 180
- IXUS 182
- IXUS 285 HS