ImageBrowser EX Does not Operate Correctly / Uninstalling and Reinstalling ImageBrowser EX (Windows 8)
FAQ ID: 8201863000
Release date: 25 December 2015
Solution
When ImageBrowser EX does not operate correctly, uninstalling (deleting) and reinstalling the software is recommended.
The procedure for uninstalling/reinstalling the software is explained below.
IMPORTANT
Before uninstalling (deleting) ImageBrowser EX, confirm that all open programs have been closed.
Uninstalling (deleting) ImageBrowser EX
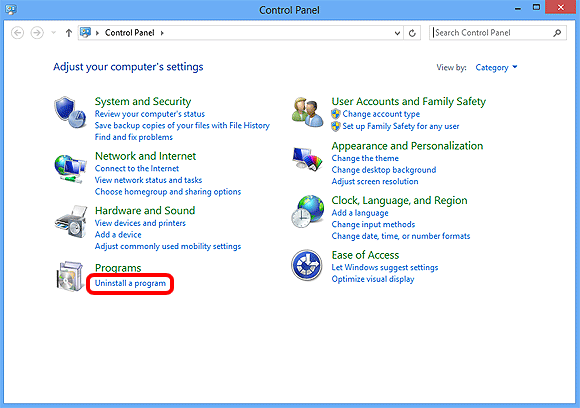
1. move the pointer to the bottom right side of the screen. When the Charms bar is displayed, move the pointer up to select
  [Settings]. Next, select the
  [Control Panel].
2. Click [Uninstall a program].
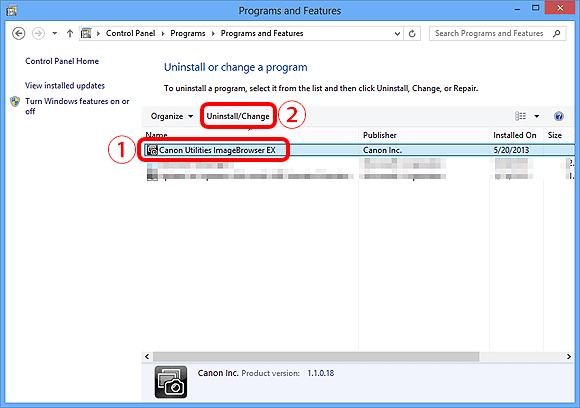
3. Select[Canon Utilities ImageBrowser EX], and then click [Uninstall/Change].
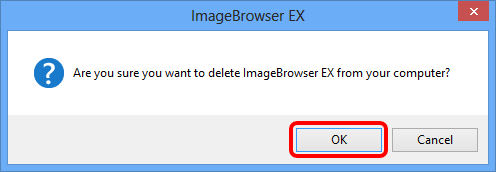
4. Click [OK] to begin the uninstallation of ImageBrowser EX.
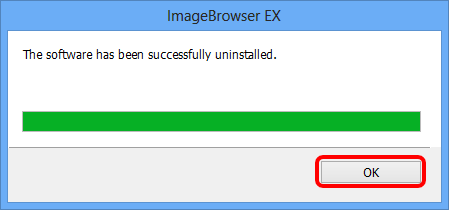
5. If the software is successfully uninstalled, the following screen will appear. Click [OK] to close the window.
Reinstalling ImageBrowser EX
1. After uninstalling ImageBrowser EX, make sure to restart your computer.IMPORTANT
- If the computer is not restarted after uninstalling ImageBrowser EX, operation problems may occur when the software is reinstalled.
- Refrain from connecting the camera to the computer before completing the reinstallation process, as misoperation may occur. Also check the ImageBrowser EX User guide to make sure the computer meets the system requirements for running the software.
- Using the auto update function of ImageBrowser EX, you can update to the latest version and download new functions via the Internet, so be sure to install the software on a computer with an Internet connection.
- Internet access is required to use this function, and any ISP account charges and access fees must be paid separately.
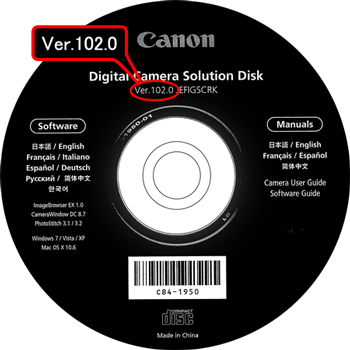
2. Confirm the version information appearing on your Digital Camera Solution Disk, before installing the software.
- If the version number is listed as Ver. 101.0 or earlier or if you do not have the Digital Camera Solution Disk, download the [ImageBrowser EX] software or [Digital Camera Software] from the Canon home page and follow the instructions displayed. If the [User Account Control] screen is displayed, follow the procedure as described.
- If the version number on your Digital Camera Solution Disk is listed as Ver. 102.0 or later, install using the procedure below.
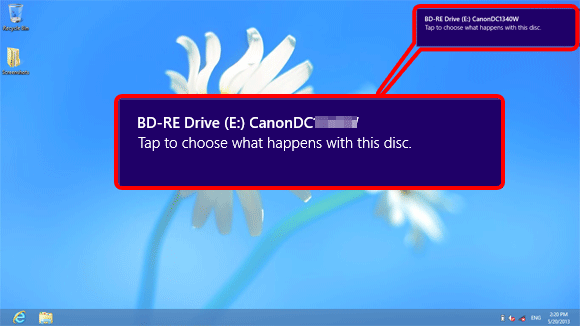
3. Insert the Digital Camera Solution Disk into your computer.
Click the window that appears in the upper right of your screen.
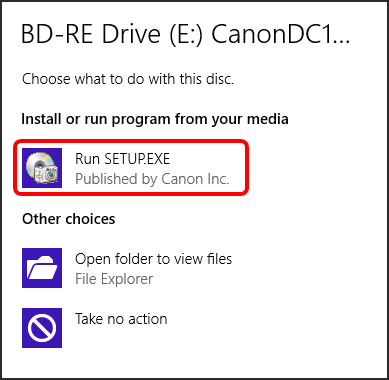
4. If the following screen appears, click [Run SETUP.EXE].
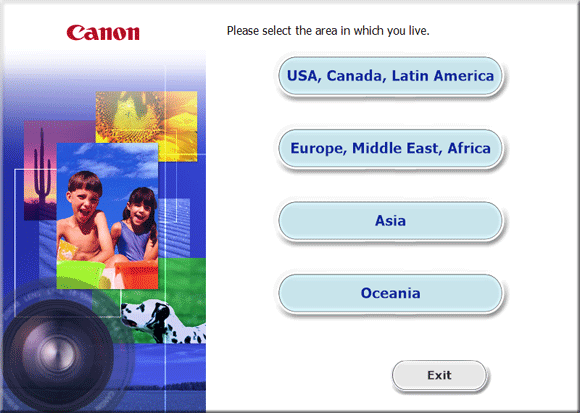
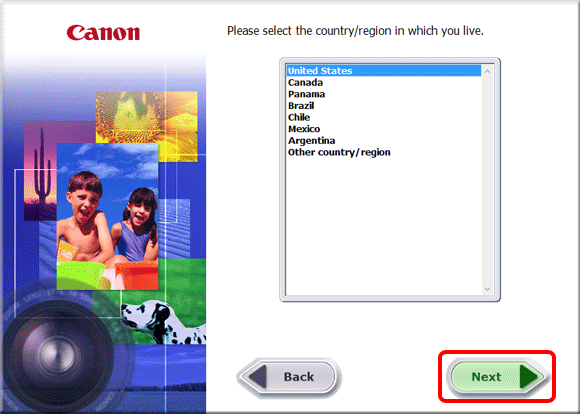
5. Select the area in which you live.
6. Select the country where you live, and then click [Next].
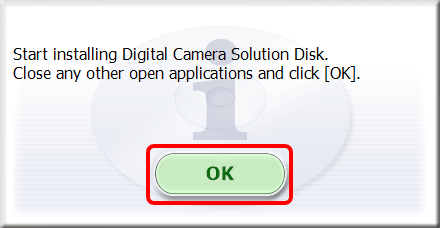
7. Click [Custom Installation] when the screen below is displayed.

8. Click [OK].
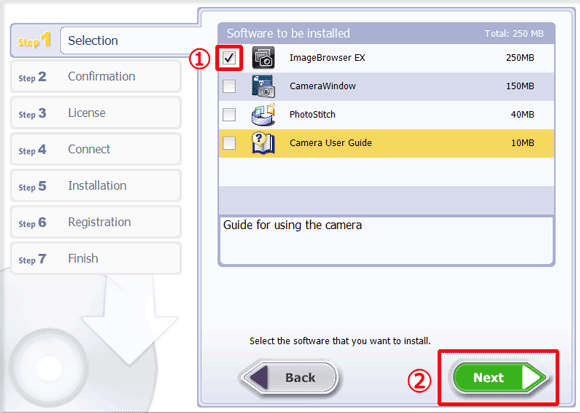
9. When the screen below appears, append ImageBrowser EX with a checkmark ( ), and then click [Next].
10. Click [Install].

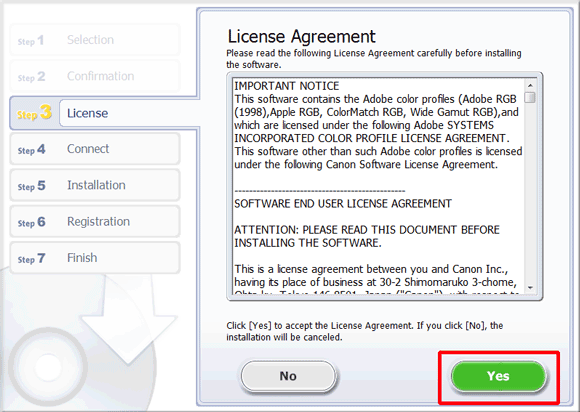
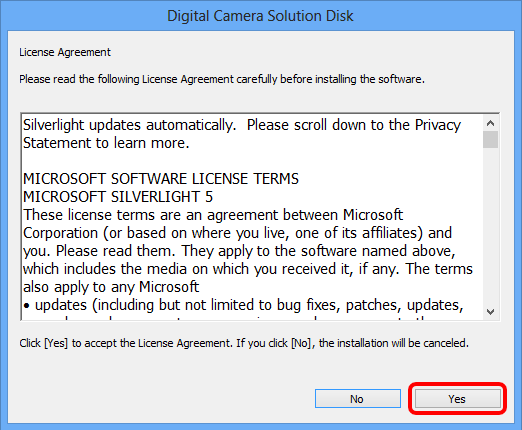
11. Click [Yes] to accept the License Agreement.
12. When using Digital Camera Solution Disk Ver.102.0 or later, the screen below will appear on computers connected to the internet. If you agree to the disclaimers, click [Yes].
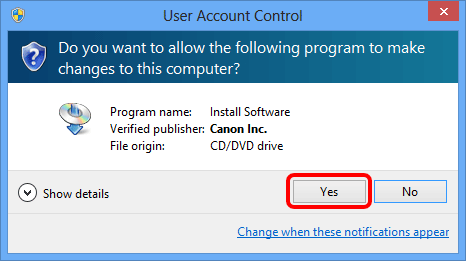
13. If the following screen appears, click [Yes].
14. The following screen appears.
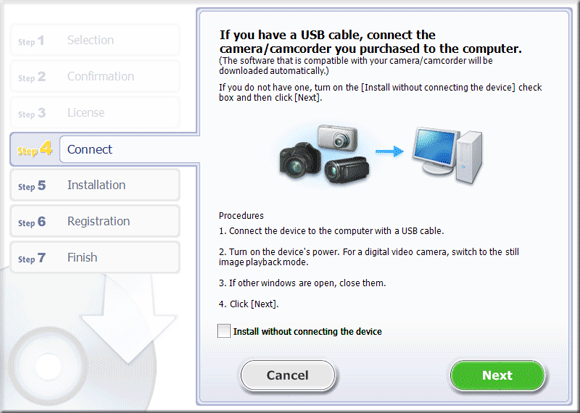
15. Connect the camera to the computer using the interface cable.
* The example below shows the setting procedure for the PowerShot A2600. The position and shape of operational buttons may differ depending on the model you use.
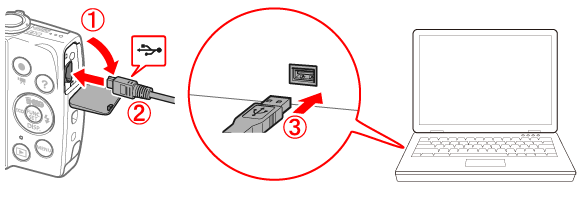
 With the camera turned off, open the cover.
  With the smaller plug of the included interface cable in the orientation shown, insert the plug fully into the camera terminal.
  Insert the larger plug of the interface cable in the computer’s USB port. For details about USB connections on the computer, refer to the computer user manual.
16. Turn the camera on.
17. Click [Next].

REFERENCE
To do the installation without connecting the camera,
select the [Install without connecting the device] check box ( ), and then click [Next]. When the next screen appears, click [OK] and proceed to step 18.
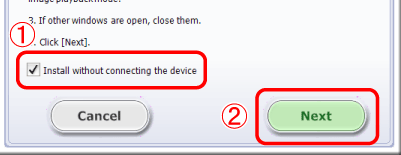
18. The following screen appears, and installation begins.
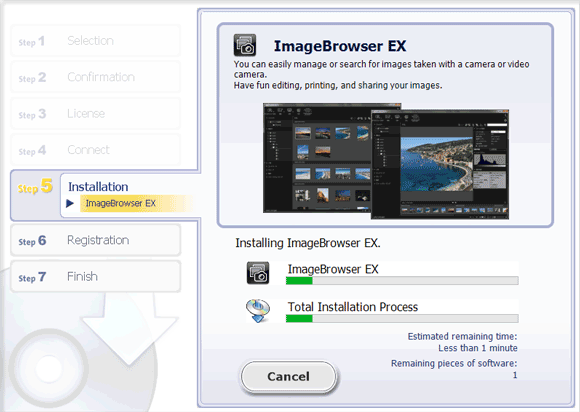
19. When the following screen appears, click [Install Now]. Follow the instructions displayed to continue installation.

IMPORTANT
If Microsoft Silverlight is not installed on the computer, ImageBrowser EX will not run. Make sure to install Microsoft Silverlight.
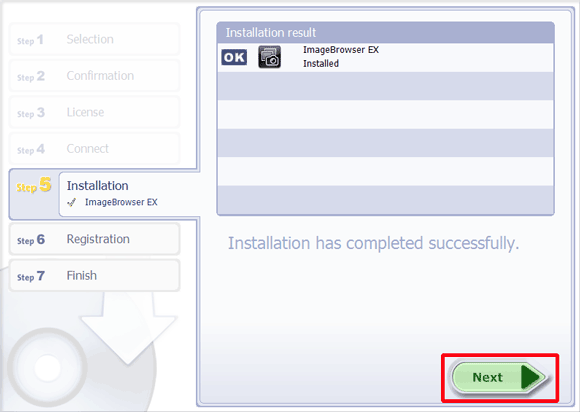
20. Click [Next].
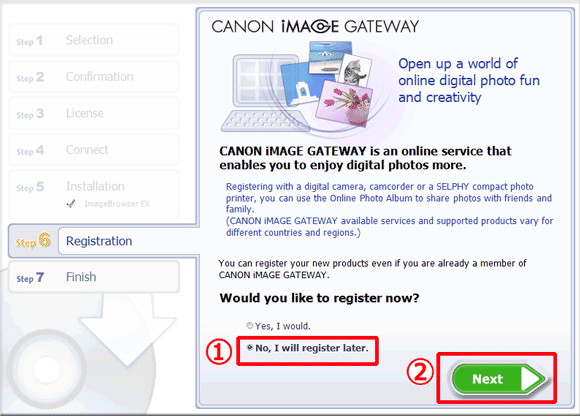
21. The following screen appears.
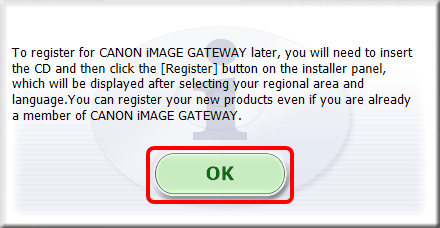
- In this example [No, I will register later] has been selected, and [Next] will be clicked.
(To register in CANON iMAGE GATEWAY, select [Yes, I would].)
22. Click [OK].
23. If you would like to restart your computer at this point (recommended), check [Restart Computer immediately (Recommended)] and click [Restart].
If you do not wish to restart at this point, make sure to restart before using ImageBrowser EX.
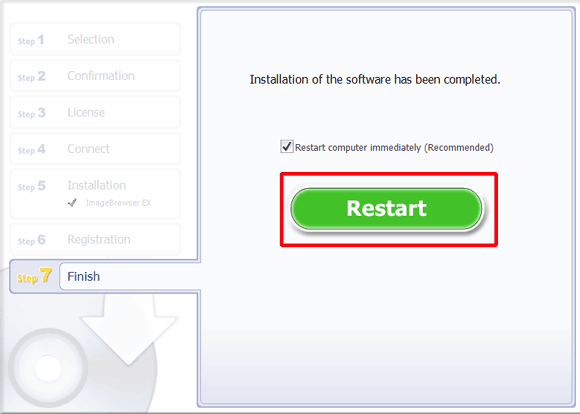
24. Remove the CD after restarting the computer
This concludes the reinstallation procedure for ImageBrowser EX.
Problems continue even after ImageBrowser EX has been reinstalled
If the following problems occur even after ImageBrowser EX has been reinstalled, there is a possibility that the database file for ImageBrowser EX may be corrupted.- ImageBrowser EX does not start.
- Nothing is displayed (images, information, etc.) after ImageBrowser EX is started.
Please follow the procedure explained below to delete the ImageBrowser EX database file, then try restarting ImageBrowser EX.
IMPORTANT
Please note that data information (operational history, etc.) contained in the ImageBrowser EX database file will also be deleted.
1. Before beginning the procedure, make sure to close ImageBrowser EX.
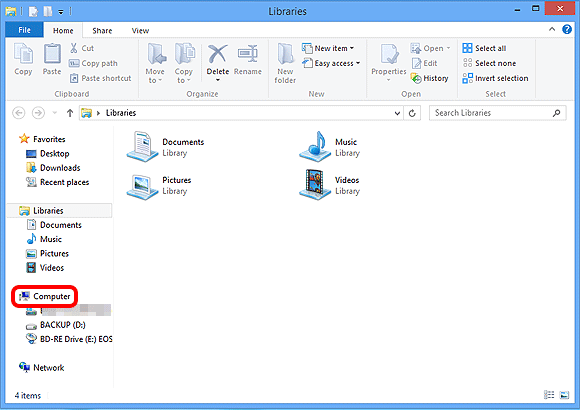
2. Click [Explorer] to display [Libraries].

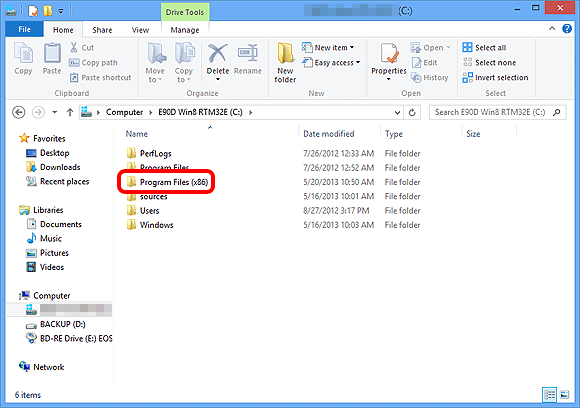
3. Click [Computer].
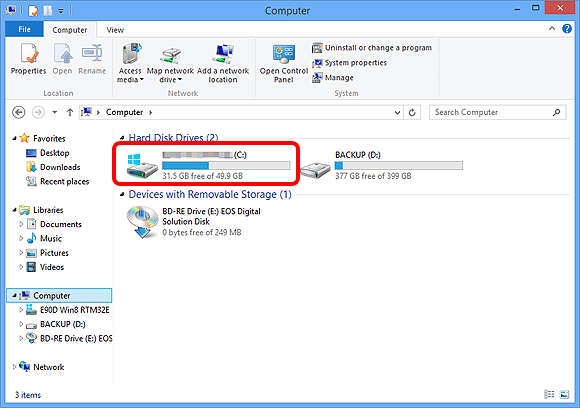
4. Double-click the [C:] drive.
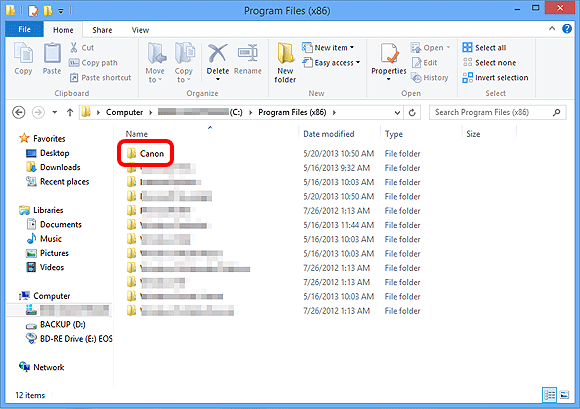
5. Double-click [Program Files(x86)].
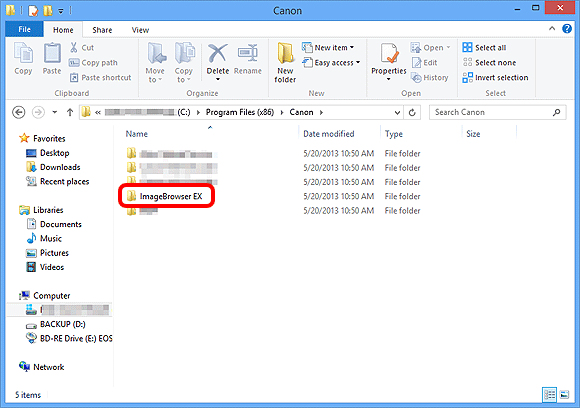
6. Double-click the [Canon] folder.
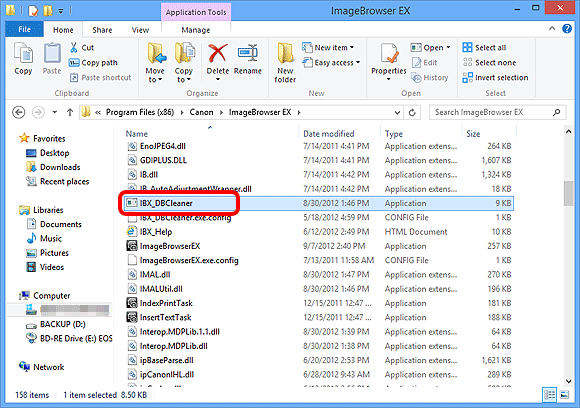
7. Double-click the [ImageBrowser EX] folder.
8. Double-click [IBX_DBcleaner].
NOTE
・Depending on the settings of your operating system, [IBX_DBcleaner.exe] may be displayed.
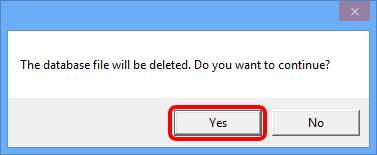
9. If the following screen is displayed, click [Yes].
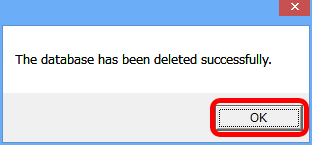
10. If the following screen is displayed, click [OK].
11. Start ImageBrowser EX.
REFERENCE
After the initial database file has been deleted, a new database file will automatically be created by ImageBrowseEX the next time it is started. This operation may take some time.
This completes the procedure for deleting the ImageBrowseEX database file.
Applicable Models
- DIGITAL IXUS 870 IS
- Digital IXUS 100 IS
- Digital IXUS 110 IS
- Digital IXUS 120 IS
- Digital IXUS 200 IS
- Digital IXUS 30
- Digital IXUS 40
- Digital IXUS 400
- Digital IXUS 430
- Digital IXUS 50
- Digital IXUS 500
- Digital IXUS 55
- Digital IXUS 60
- Digital IXUS 65
- Digital IXUS 70
- Digital IXUS 700
- Digital IXUS 75
- Digital IXUS 750
- Digital IXUS 80 IS
- Digital IXUS 800 IS
- Digital IXUS 82 IS
- Digital IXUS 85 IS
- Digital IXUS 850 IS
- Digital IXUS 860 IS
- Digital IXUS 90 IS
- Digital IXUS 900 Ti
- Digital IXUS 95 IS
- Digital IXUS 950 IS
- Digital IXUS 960 IS
- Digital IXUS 970 IS
- Digital IXUS 980 IS
- Digital IXUS 990 IS
- Digital IXUS II
- Digital IXUS IIs
- Digital IXUS V3
- Digital IXUS Wireless
- Digital IXUS i
- Digital IXUS i zoom
- Digital IXUS i5
- Digital IXUS i7 zoom
- IXUS 1000 HS
- IXUS 105
- IXUS 1100 HS
- IXUS 115 HS
- IXUS 125 HS
- IXUS 130
- IXUS 132
- IXUS 140
- IXUS 145
- IXUS 147
- IXUS 150
- IXUS 155
- IXUS 157
- IXUS 210
- IXUS 220 HS
- IXUS 230 HS
- IXUS 240 HS
- IXUS 255 HS
- IXUS 265 HS
- IXUS 300 HS
- IXUS 310 HS
- IXUS 500 HS
- IXUS 510 HS
- PowerShot A1000 IS
- PowerShot A1100 IS
- PowerShot A1200
- PowerShot A1300
- PowerShot A1400
- PowerShot A2000 IS
- PowerShot A2100 IS
- PowerShot A2200
- PowerShot A2300
- PowerShot A2400 IS
- PowerShot A2500
- PowerShot A2600
- PowerShot A300
- PowerShot A3000 IS
- PowerShot A310
- PowerShot A3100 IS
- PowerShot A3200 IS
- PowerShot A3300 IS
- PowerShot A3400 IS
- PowerShot A400
- PowerShot A4000 IS
- PowerShot A410
- PowerShot A420
- PowerShot A430
- PowerShot A450
- PowerShot A460
- PowerShot A470
- PowerShot A480
- PowerShot A490
- PowerShot A495
- PowerShot A510
- PowerShot A520
- PowerShot A530
- PowerShot A540
- PowerShot A550
- PowerShot A560
- PowerShot A570 IS
- PowerShot A580
- PowerShot A590 IS
- PowerShot A60
- PowerShot A610
- PowerShot A620
- PowerShot A630
- PowerShot A640
- PowerShot A650 IS
- PowerShot A70
- PowerShot A700
- PowerShot A710 IS
- PowerShot A720 IS
- PowerShot A75
- PowerShot A80
- PowerShot A800
- PowerShot A810
- PowerShot A85
- PowerShot A95
- PowerShot D10
- PowerShot D20
- PowerShot D30
- PowerShot E1
- PowerShot G1 X
- PowerShot G1 X Mark II
- PowerShot G10
- PowerShot G11
- PowerShot G12
- PowerShot G15
- PowerShot G16
- PowerShot G3
- PowerShot G5
- PowerShot G6
- PowerShot G7
- PowerShot G7 X
- PowerShot G9
- PowerShot N
- PowerShot N100
- PowerShot N2
- PowerShot Pro1
- PowerShot S1 IS
- PowerShot S100
- PowerShot S110
- PowerShot S120
- PowerShot S2 IS
- PowerShot S200
- PowerShot S3 IS
- PowerShot S45
- PowerShot S5 IS
- PowerShot S50
- PowerShot S60
- PowerShot S70
- PowerShot S80
- PowerShot S90
- PowerShot S95
- PowerShot SX1 IS
- PowerShot SX10 IS
- PowerShot SX100 IS
- PowerShot SX110 IS
- PowerShot SX120 IS
- PowerShot SX130 IS
- PowerShot SX150 IS
- PowerShot SX160 IS
- PowerShot SX170 IS
- PowerShot SX20 IS
- PowerShot SX200 IS
- PowerShot SX210 IS
- PowerShot SX220 HS
- PowerShot SX230 HS
- PowerShot SX240 HS
- PowerShot SX260 HS
- PowerShot SX270 HS
- PowerShot SX280 HS
- PowerShot SX30 IS
- PowerShot SX40 HS
- PowerShot SX400 IS
- PowerShot SX50 HS
- PowerShot SX500 IS
- PowerShot SX510 HS
- PowerShot SX520 HS
- PowerShot SX60 HS
- PowerShot SX600 HS
- PowerShot SX700 HS
- PowerShot TX1