Loading Paper
FAQ ID: 8200266300
Release date: 19 August 2008
Solution
IMPORTANT
If you cut plain paper into small size such as 4" x 6" / 10 x 15 cm, 4" x 8" / 101.6 x 203.2 mm, 5" x 7" / 13 x 18 cm, or 2.16" x 3.58" / 55.0 x 91.0 mm (Card size) to perform trial print, it can cause paper jams.
REFERENCE
- You can load only A4, B5, A5, or Letter-sized plain paper in the Cassette. Load other sizes or types of paper in the Rear Tray.
- We recommend Canon genuine photo paper for printing photos. For details on the Canon genuine paper, see Compatible Media Types.
- You can use general copy paper. When printing on both sides, we recommend Canon's Super White Paper. For the page size and paper weight you can use for this machine, see Compatible Media Types.
Loading Paper in the Rear Tray
1. Flatten the four corners of paper before loading it.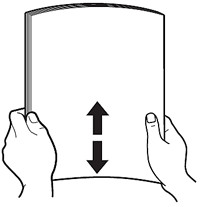
REFERENCE
- Align the edges of paper neatly before loading. Loading paper without aligning the edges may cause paper jams.
- If paper is curled, hold the curled corners and gently bend them in the opposite direction until the paper becomes completely flat.
For details on how to flatten curled paper, refer to Paper Is Smudged/Printed Surface Is Scratched.
2. Prepare for loading paper.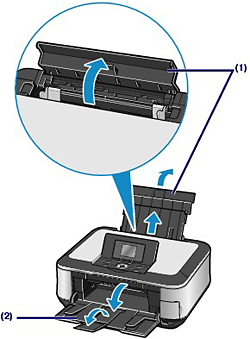
(1) Open the Paper Support, raise it, then tip it back.
(2) Open the Paper Output Tray gently, and open the Output Tray Extension.
3. Load paper.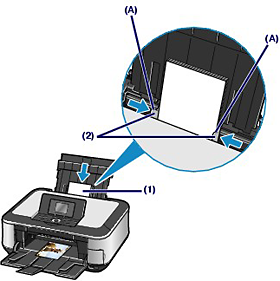
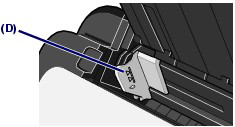
(1) Slide the Paper Guides (A) to open them, and load the paper in the center of the Rear Tray WITH THE PRINT SIDE FACING YOU.
IMPORTANT
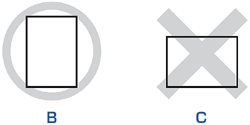
Always load paper in the portrait orientation (B). Loading paper in the landscape orientation (C) can cause paper jams.
(2) Slide the Paper Guides (A) to align them with both sides of the paper stack.
Do not slide the Paper Guides too hard. The paper may not be fed properly.
REFERENCE
Do not load higher than the Load Limit Mark (D).
REFERENCE
- After loading paper
- When using the machine to copy or print without a computer, select the size and type of the loaded paper in Page size and Media type of the print settings in each menu of the HOME screen.
- When printing with a computer, select the size and type of the loaded paper in Page Size (or Paper Size) and Media Type in the printer driver.
See Printing Documents (Windows) or Printing Documents (Macintosh).
Loading Paper in the Cassette
You can load only A4, B5, A5, or Letter-sized plain paper in the Cassette.See Compatible Media Types.
1. Flatten the four corners of paper before loading it.
REFERENCE
- Align the edges of paper neatly before loading. Loading paper without aligning the edges may cause paper jams.
- If paper is curled, hold the curled corners and gently bend them in the opposite direction until the paper becomes completely flat.
For details on how to flatten curled paper, refer to Paper Is Smudged/Printed Surface Is Scratched.
2. Pull out the Cassette from the machine.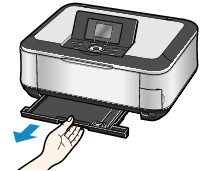
3. Load paper.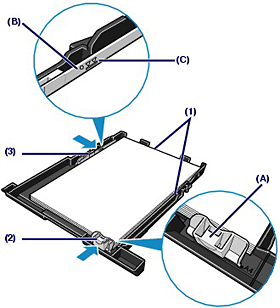
(1) Load the paper stack WITH THE PRINT SIDE FACING DOWN and THE LEADING EDGE TO THE FAR SIDE, and align it against the right side of the Cassette.
(2) Slide the Paper Guide (A) to align with the mark of paper size.
The Paper Guide (A) will stop when it aligns with the corresponding mark of paper size.
REFERENCE
There may be a little space between the Paper Guide (A) and the paper stack.
(3) Slide the Paper Guide (B) on the left to align completely with the side of the paper stack.
REFERENCE
Do not load higher than the Load Limit Mark (C).
4. Insert the Cassette into the machine.
Push the Cassette all the way into the machine.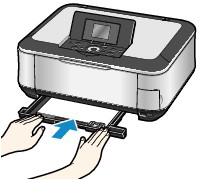
5. Open the Paper Output Tray gently, and open the Output Tray Extension.
REFERENCE
After loading paper
- When using the machine to copy or print without a computer, select the size and type of the loaded paper in Page size and Media type of the print settings in each menu of the HOME screen.
- When printing with a computer, select the size and type of the loaded paper in Page Size (or Paper Size) and Media Type in the printer driver.
See Printing Documents (Windows) or Printing Documents (Macintosh).
Applicable Models
- PIXMA MP620
- PIXMA MP620B