Aligning the Print Head
FAQ ID: 8200214700
Release date: 17 October 2008
Solution
If printed ruled lines are misaligned or print results are otherwise unsatisfactory, adjust the print head position.
You need to prepare: three sheets of A4 or Letter-sized plain paper
NOTE
The print head alignment pattern is printed in black and blue.
Windows
1. Make sure that the power is turned on and three or more sheets of A4 or Letter-sized plain paper are loaded in the Cassette.2. Open the Paper Output Tray gently, and extend to open the Output Tray Extension.
3. Open the printer properties dialog box.
4. Print the print head alignment pattern.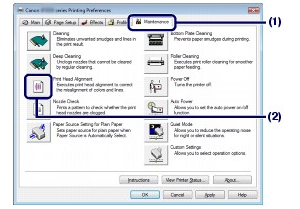
(1) Click the Maintenance tab.
(2) Click Print Head Alignment.
(3) Confirm the displayed message, and click Align Print Head.
The print head alignment pattern will be printed. Do not open the Top Cover while printing is in progress.
NOTE
Confirm that one or more sheets of A4 or Letter-sized plain paper are loaded in the Cassette, then click Print Alignment Value to check the current settings before printing the pattern.
(4) After the pattern below is printed, make sure that the pattern is printed properly, and click Yes.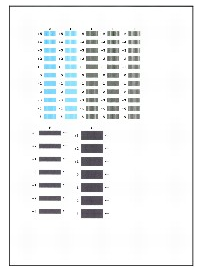
5. Adjust the print head position.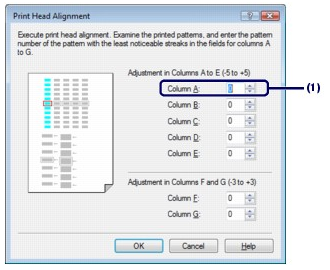
NOTE
- If it is difficult to select the best pattern, select the pattern that has the least noticeable white streaks.
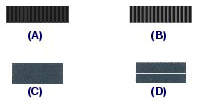
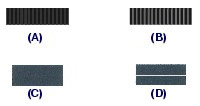
(A) Less noticeable vertical white streaks
(B) Noticeable vertical white streaks
(C) Less noticeable horizontal white streaks
(D) Noticeable horizontal white streaks
(1) Look at the printout and select the pattern number in column A that has the least noticeable streaks.
(2) Repeat the procedure until you finish selecting the pattern number for column G, and click OK.
NOTE
To cancel aligning the Print Head, click Cancel.
(3) Confirm the displayed message, and click OK.
The second pattern will be printed. Do not open the Top Cover while printing.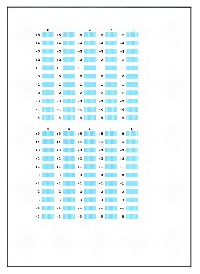
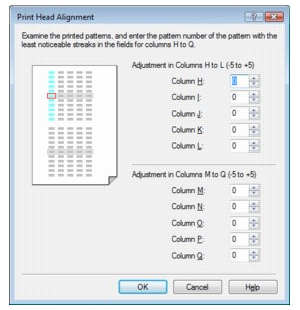
(4) Look at the printout, select the pattern numbers in columns H to Q respectively that have the least noticeable streaks, then click OK.
NOTE
To cancel aligning the Print Head, click Cancel.
(5) Confirm the displayed message, and click OK.
The third pattern will be printed. Do not open the Top Cover while printing.
(6) Look at the printout and select the pattern number in column a that has the least noticeable stripes.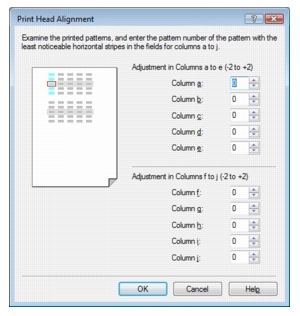
NOTE
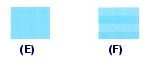
- If it is difficult to select the best pattern, select the pattern that has the least noticeable horizontal white stripes.
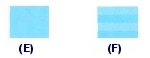
(E) Less noticeable horizontal white stripes
(F) More noticeable horizontal white stripes
(7) Repeat the procedure until you finish inputting the pattern number for column j, and click OK.
NOTE
To cancel aligning the Print Head, click Cancel.
(8) Confirm the displayed message, and click OK.
Macintosh
1. Make sure that the power is turned on and three or more sheets of A4 or Letter-sized plain paper are loaded in the Cassette.2. Open the Paper Output Tray gently, and extend to open the Output Tray Extension.
3. Open the Canon IJ Printer Utility dialog box.
4. Print the print head alignment pattern.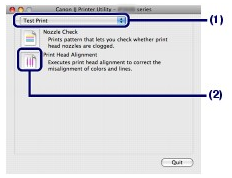
(1) Select Test Print in the pop-up menu.
(2) Click Print Head Alignment.
(3) Confirm the displayed message, and click Align Print Head.
The print head alignment pattern will be printed. Do not open the Top Cover while printing is in progress.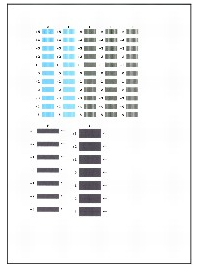
NOTE
To check the current settings before aligning the Print Head, confirm that one or more sheets of A4 or Letter-sized plain paper are loaded in the Cassette, then click Print Alignment Value.
5. Adjust the print head position.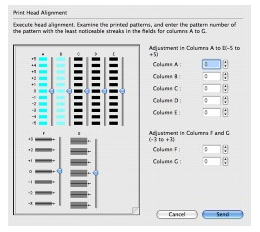
NOTE
- If it is difficult to select the best pattern, select the pattern that has the least noticeable white streaks.
(A) Less noticeable vertical white streaks
(B) Noticeable vertical white streaks
(C) Less noticeable horizontal white streaks
(D) Noticeable horizontal white streaks
(1) Look at the printout and select the pattern number in column A that has the least noticeable streaks.
(2) Repeat the procedure until you finish selecting the pattern number for column G, and, click Send.
NOTE
To cancel aligning the Print Head, click Cancel.
(3) Confirm the displayed message, and click OK.
The second pattern will be printed. Do not open the Top Cover while printing.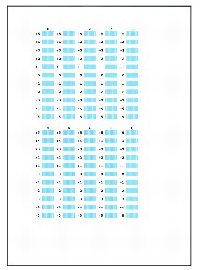
(4) Look at the printout, select the pattern numbers in columns H to Q respectively that have the least noticeable streaks, then click Send.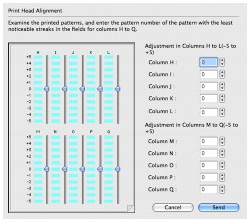
NOTE
To cancel aligning the Print Head, click Cancel.
(5) Confirm the displayed message, and click OK.
The third pattern will be printed. Do not open the Top Cover while printing.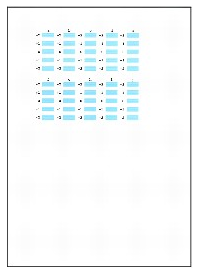
(6) Look at the printout and select the pattern number in column a that has the least noticeable stripes.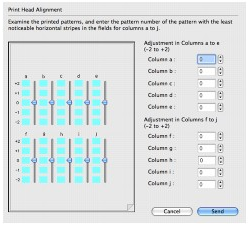
NOTE
- If it is difficult to select the best pattern, select the pattern that has the least noticeable horizontal white stripes.
(E) Less noticeable horizontal white stripes
(F) More noticeable horizontal white stripes
(7) Repeat the procedure until you finish selecting the pattern number for column j, and click Send.
NOTE
To cancel aligning the Print Head, click Cancel.
Applicable Models
- PIXMA iP3600