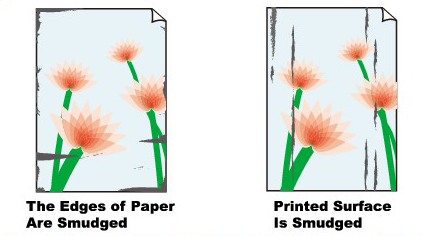
Paper Is Smudged/Printed Surface Is Scratched
FAQ ID: 8200530800
Release date: 25 May 2009
Details
Helpful Information
Check 1: Did you confirm the paper and print quality settings?
Check 2: Is the appropriate type of paper being used? Check the following
Check 3: Load the paper after correcting its curl
Check 4: If you are printing on thick paper, select the Prevent paper abrasion setting
Check 5: If the intensity is set high, reduce the Intensity setting in the printer driver and try printing again
Check 6: Is printing performed beyond the recommended printing area?
Check 7: Is the Paper Feed Roller dirty?
Check 8: Is inside of the printer dirty?
Check 9: Set Ink Drying Wait Time longer
Check 10: Is the paper scratched by other loaded paper?
Solution
Check 1: Did you confirm the paper and print quality settings?
Check 2: Is the appropriate type of paper being used? Check the following
- Check to see if the paper you are printing on is suitable for your printing purpose.
-> [ Media Types You Can Use ]
- When performing Borderless Printing, make sure that the paper you are using is suitable for Borderless Printing. If the paper you are using is not suitable for Borderless Printing, the print quality may be reduced at the top and bottom edges of the paper.
-> [ Printing Area ]
Check 3: Load the paper after correcting its curl
- For Plain Paper
Turn the paper over and reload it to print on the other side.
Leaving the paper loaded on the Rear Tray for a long time may cause the paper to curl. In this case, load the paper with the other side facing up. It may resolve the problem.
We recommend putting unused paper back into the package and keeping it on a level surface.
- For Other Paper
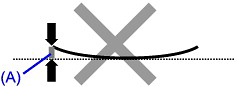
If the curl on the four corners of the paper is more than 0.1 inch / 3 mm (A) in height, the paper may be smudged or may not be fed properly. In such cases, follow the procedure described below to correct the paper curl.
1. Roll up the paper in the opposite direction to the paper curl as shown below.
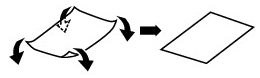
2. Check that the paper is now flat.
We recommend printing curl-corrected paper one sheet at a time.
NOTE
- Depending on the media type, the paper may be smudged or may not be fed properly even if it is not curled inward. In such cases, follow the procedure described below to curl the paper outward within 0.1 inch / 3 mm (B) in height before printing. This may improve the print result.
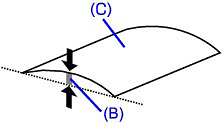
(C) Printing side
We recommend printing paper that has been curled outward one sheet at a time.
Check 4: If you are printing on thick paper, select the Prevent paper abrasion setting
Selecting the Prevent paper abrasion setting will widen the clearance between the Print Head and the loaded paper. If you notice abrasion even with the media type set correctly to match the loaded paper, set the printer to prevent paper abrasion by using the printer driver.
Print speed is reduced if you are selecting the Prevent paper abrasion setting.
* Deactivate the Prevent paper abrasion setting once printing is complete. If not, this setting remains enabled for all subsequent print jobs.
Open the printer properties dialog box, and in Custom Settings in the Maintenance sheet, select the Prevent paper abrasion check box, and then click Send.
In the Canon IJ Printer Utility, select Custom Settings in the pop-up menu, select the Prevent paper abrasion check box, and then click Send.
Check 5: If the intensity is set high, reduce the Intensity setting in the printer driver and try printing again
If you are using plain paper to print images with high intensity, the paper may absorb too much ink and become wavy, causing paper abrasion.
Reduce the Intensity setting in the printer driver and try printing again.
1.Open the printer properties dialog box.
2.On the Main sheet, select Manual for Color/Intensity, and then click Set.
3.Drag the Intensity slide bar on the Color Adjustment sheet to adjust the intensity.
1.Open the Print dialog box.
2.Select Color Options in the pop-up menu.
3.Drag the Intensity slide bar to set the intensity.
Check 6: Is printing performed beyond the recommended printing area?
If you are printing beyond the recommended printing area of your printing paper, the lower edge of the paper may become stained with ink.
Resize your original document in your application software.
-> [ Printing Area ]
Check 7: Is the Paper Feed Roller dirty?
Clean the Paper Feed Roller.
-> [ Cleaning the Paper Feed Rollers ]
NOTE
- Cleaning the Paper Feed Roller will wear the roller, so perform this procedure only when necessary.
Check 8: Is inside of the printer dirty?
When performing duplex printing, the inside of the printer may become stained with ink, causing the printout to become smudged.
Perform the Bottom Plate Cleaning to clean the inside of the printer.
-> [ Cleaning Inside the Printer ]
NOTE
- To prevent the inside of the printer from stains, set the paper size correctly.
Check 9: Set Ink Drying Wait Time longer
Doing so gives the printed surface enough time to dry so that paper smudged and scratched are prevented.
1.Make sure that the printer is turned on.
2.Open the printer properties dialog box.
3.Click the Maintenance tab and then Custom Settings.
4.Drag the Ink Drying Wait Time slide bar to set the wait time, and then click Send.
5.Confirm the message and click OK.
1.Make sure that the printer is turned on.
2.Open the Canon IJ Printer Utility.
3.Select Custom Settings in the pop-up menu.
4.Drag the Ink Drying Wait Time slide bar to set the wait time, and then click Send.
5.Confirm the message and click OK.
Check 10: Is the paper scratched by other loaded paper?
Depending on the media type, the paper may be scratched by other loaded paper when feeding from the Rear Tray. In this case, load one sheet at a time.
Applicable Models
- PIXMA iX7000