Paper Is Smudged/Printed Surface Is Scratched
FAQ ID: 8200817200
Release date: 01 March 2011
Details
- Paper Is Smudged
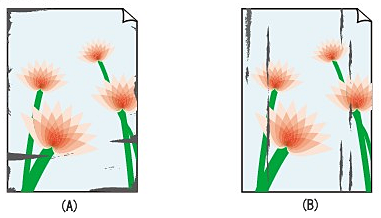
(A) The Edges of Paper Are Smudged
(B) Printed Surface Is Smudged
- Printed Surface Is Scratched
Helpful Information
Check 1: Did you confirm the paper and print quality settings?
Check 2: Is the appropriate type of paper used? Check the followings:
Check 3: Load the paper after correcting its curl
Check 4: If you are printing on thick paper, select the Prevent paper abrasion setting
Check 5: If the intensity is set high, reduce the Intensity setting in the printer driver and try printing again
Check 6: Is printing performed beyond the recommended printing area?
Check 7: Is the Platen Glass dirty?
Check 8: Is the Paper Feed Roller dirty?
Check 9: Is the inside of the machine dirty?
Check 10: Set Ink Drying Wait Time longer
Check 11: Is the paper scratched by other loaded paper?
Solution
Check 1: Did you confirm the paper and print quality settings?
Check 2: Is the appropriate type of paper used? Check the followings:
- Check to see if the paper you are printing on is suitable for your printing purpose.
-> [ Media Types You Can Use ]
- When performing Borderless Printing, make sure that the paper you are using is suitable for Borderless Printing. If the paper you are using is not suitable for Borderless Printing, the print quality may be reduced at the top and bottom edges of the paper.
-> [ Printing Area ]
Check 3: Load the paper after correcting its curl
- For Plain Paper
Turn the paper over and reload it to print on the other side.
Leaving the paper loaded on the Rear Tray for a long time may cause the paper to curl. In this case, load the paper with the other side facing up. It may resolve the problem.
We recommend putting unused paper back into the package and keeping it on a level surface.
- For Other Paper
If the curl on the four corners of the paper is more than 0.1 inch / 3 mm (A) in height, the paper may be smudged or may not be fed properly. In such cases, follow the procedure described below to correct the paper curl.

1. Roll up the paper in the opposite direction to the paper curl as shown below.
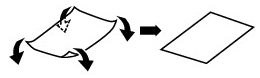
2. Check that the paper is now flat.
We recommend printing curl-corrected paper one sheet at a time.
REFERENCE
- Depending on the media type, the paper may be smudged or may not be fed properly even if it is not curled inward. In such cases, follow the procedure described below to curl the paper outward within 0.1 inch / 3 mm (B) in height before printing. This may improve the print result.
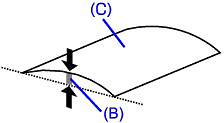
(C) Printing side
We recommend printing paper that has been curled outward one sheet at a time.
Check 4: If you are printing on thick paper, select the Prevent paper abrasion setting
Selecting the Prevent paper abrasion setting will widen the clearance between the Print Head and the loaded paper. If you notice abrasion even with the media type set correctly to match the loaded paper, set the machine to prevent paper abrasion by using the Operation Panel or the computer.
Print speed may be reduced if you are selecting the Prevent paper abrasion setting.
* Deactivate the Prevent paper abrasion setting once printing is complete. If not, this setting remains enabled for all subsequent print jobs.
- To set by using the Operation Panel
Press the HOME button, select Setup, Device settings, and Print settings in this order, and then set Prevent paper abrasion to ON.
- To set by using your computer

Open the printer driver setup window, and in Custom Settings in the Maintenance sheet, select the Prevent paper abrasion check box, and then click Send.

In the Canon IJ Printer Utility, select Custom Settings in the pop-up menu, select the Prevent paper abrasion check box, and then click Send.
Check 5: If the intensity is set high, reduce the Intensity setting in the printer driver and try printing again
If you are using plain paper to print images with high intensity, the paper may absorb too much ink and become wavy, causing paper abrasion.
- When printing from your computer
Reduce the Intensity setting in the printer driver and try printing again.
1. Open the printer driver setup window.
2. On the Main sheet, select Manual for Color/Intensity, and then click Set.
3. Drag the Intensity slide bar on the Color Adjustment sheet to adjust the intensity.

1. Open the Print dialog box.
2. Select Color Options in the pop-up menu.
3. Drag the Intensity slide bar to set the intensity.
- When copying
Making Copies
This section describes the procedure to copy a document of A4 size on plain paper.
You need to prepare:
Originals to copy. 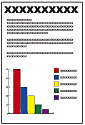
Paper for printing.
See [ Media Types You Can Use ]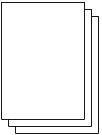
1. Prepare for copying.
(1) Turn on the power.
(2) Load paper.
See [ Loading Paper ]
Here we make sure that A4 plain paper is loaded in the Cassette.
NOTE
- Load A4, B5, A5, or Letter-sized plain paper in the Cassette. Load other sizes or types of paper in the Rear Tray.
(3) Open the Paper Output Tray gently, and open the Output Tray Extension.
(4) Select Copy  on the HOME screen.
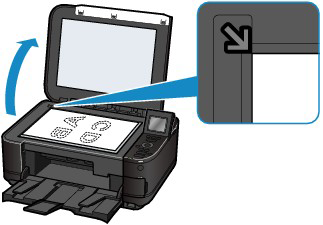
(5) Load an original on the Platen Glass.
To load the original on the Platen Glass, align it with the alignment mark  WITH THE SIDE TO COPY FACING DOWN as shown below.
Then close the Document Cover gently.
NOTE
- Characters and lines written with a light colored pen or highlight pen may not be copied properly.
2. Start copying.
(1) Use the [+] or [-] button (A) to specify the number of copies.
The number of copies can be changed with the Scroll Wheel.
(2) Use the  or
or  button (B) to specify the magnification.
Here we select 100%.
(3) Use the  or
or  button (C) to specify the copy intensity.
Press the button to decrease the intensity and the button to increase the intensity. You can also select automatic intensity adjustment.
(4) Press the right Function button (D) to select Print settings, and confirm the page size, media type, etc.
Here we confirm that A4 is selected for Page size and Plain paper for Type.
To change the settings, use the or button (Scroll Wheel) (B) to select the item to change, and use the or button (C) to select an option. After confirming or changing the settings, press the OK button to return to the copy standby screen.
NOTE
- You can check the preview of print result if you press the center Function button (E) when copying the original on the Platen Glass.
- You can select various copy functions, such as Borderless copy, if you press the left Function button (F) to select Copy menu.
(5) Press the Color button (G) for color copying, or the Black button (H) for black & white copying.
The machine starts copying.
Remove the original on the Platen Glass after copying is completed.
IMPORTANT
- Do not open the Document Cover or move the loaded original until copying is completed.
NOTE
- Press the Stop button to cancel copying.
Changing the Settings
Press the right Function button to select Print settings on the copy standby screen. You can select the item, such as page size, media type, or print quality, and change the setting.
(1) Magnif. (Magnification)
Specify the enlargement/reduction manner. You can specify the copy scale by selecting the page size: A4 to A5, A4 to B5, etc. If you do not want to enlarge/reduce the page size, select SameMagnification.
(2) Intensity
Specify the intensity when you want to make the darkened/lightened copy. Select Auto to automatically adjust the intensity according to the original.
(3) Page size
Select the page size of the paper to print: A4, 8.5"x11" (LTR), etc.
(4) Type (Media type)
Select the media type of the paper to print: Plain paper, Plus Glossy II, etc.
NOTE
- If you do not select the page size and media type correctly, the machine may feed paper from the wrong paper source or may not print with the proper print quality.
See [ Paper Sources to Load Paper ]
(5) Print qlty (Print quality)
Select the print quality according to the original to copy: Standard, High, etc. The available print quality settings depend on the paper selected for Type.
(6) 2-sided
Copy a single side of two originals to both sides of a single paper. When 2-sided is selected, press the right Function button to select Advanced and specify the staple side of the print paper.
(7) Layout
Select the layout: 2-on-1 copy or 4-on-1 copy.
(8) Orientation
Select the orientation of the original to copy: Portrait or Landscp.
NOTE
- If Two-sided copy is selected or 2-sided is set, select A4 or 8.5"x11" (LTR) for Page size and Plain paper for Type.
- If 2-on-1 copy or 4-on-1 copy is selected, select A4 or 8.5"x11" (LTR) for Page size.
- If Borderless copy is selected, select 8.5"x11" (LTR), A4, 4"x6" (10x15cm), or 5"x7" (13x18cm) for Page size and any types of paper except Plain paper for Type.
- If Borderless copy is selected, slight cropping may occur at the edges since the copied image is enlarged to fill the whole page.
- The settings of the page size, media type, print quality, automatic intensity adjustment, etc. are retained, and these settings will appear next time when Copy is selected even if the power is turned off and on.
- If the combination of some setting items is invalid, the mark
 appears at the invalid item. Press the left Function button to select Error details and check the error message, then correct the settings.
 - If you select Fast with the media type set to Plain paper and the quality is not as good as expected, select Standard or High and then try copying again.
Using Useful Copy Functions
- How to Select a Useful Copy Menu
This section describes the procedure to select the copy menu.
1. Make sure that the machine is turned on.
2. Load the original on the Platen Glass.
NOTE
- For details on the types and conditions of originals which you can copy.
3. Select  Copy on the HOME screen.
The Standard copy screen is displayed.
4. Press the left Function button.
The Copy menu screen is displayed.
5. Use the button to select the copy menu.
Select the copy menu that you want to use, then follow the on-screen instructions.
NOTE
- If you return to Standard copy after you selected the copy menu other than Standard copy, press the Stop button. If the number of copies, the magnification, or the intensity has been set already, press the Stop button twice.
- After the copy menu is selected, you can change the print setting by pressing the right Function button on the Copy standby screen. Depending on the copy menu, some setting items cannot be selected and some settings cannot be specified.
- Copying onto Both Sides of the Paper (Two-sided copy)
You can copy two original pages onto the both sides of a single sheet of paper.
(A) Long-side stapling
(B) Short-side stapling
1. Display the Copy menu screen.
2. Load paper.
3. Select  Two-sided copy, then press the OK button.
The default setting for two-sided copy is displayed.
4. Confirm the instruction on the LCD, then press the OK button.
The Copy standby screen is displayed.
NOTE
- You can specify the stapling side of paper. To specify the stapling side, follow the procedure below.
1. Press the right Function button on the Copy standby screen.
The print settings screen is displayed.
2. Use the
button to select 2-sided.3. Make sure that 2-sided is specified, then press the right Function button.
The Stapling side of print paper screen is displayed.
4. Use the
button to select the stapling side, then press the OK button.The print settings screen is displayed. To return to the Copy standby screen, press the OK button again.
5. Specify the number of copies by using the + or - button.
Change the print settings as necessary.
6. Press the Color button for color copying, or the Black button for black & white copying.
The machine starts scanning the original of front side (the first sheet). After scanning is complete, the Document setting screen is displayed.
NOTE
- If you press the left Function button, only the original of front side (the first sheet) is copied.
7. Remove the original of front side (the first sheet) from the Platen Glass, then load the original of back side (the second sheet) on the Platen Glass.
8. Press the OK button.
The machine starts scanning the original of back side (the second sheet) and copying.
NOTE
- This copy menu can be used in combination with 2-on-1 copy or 4-on-1 copy. When you use this copy menu in combination, select 2-on-1 copy or 4-on-1 copy in Layout on the print settings screen.
For details on 2-on-1 copy or 4-on-1 copy, refer to below.
-> [ Copying Two Pages to Fit onto a Single Page (2-on-1 copy) ]
-> [ Copying Four Pages to Fit onto a Single Page (4-on-1 copy) ]
- If you perform black & white copying for Two-sided copy, print intensity may be different from when performing black & white copying for single-sided copy.
- Copying Two Pages to Fit onto a Single Page (2-on-1 copy)
You can copy two original pages (A) (B) onto a single sheet of paper (C) by reducing each image.
1. Display the Copy menu screen.
2. Load paper.
3. Select  2-on-1 copy, then press the OK button.
The default setting for 2-on-1 copy is displayed.
4. Confirm the instruction on the LCD, then press the OK button.
The Copy standby screen is displayed.
NOTE
- You can specify the layout. To specify the layout, follow the procedure below.
1. Press the right Function button on the Copy standby screen.
The print settings screen is displayed.
2. Use the
button to select Layout.3. Make sure that 2-on-1 copy is specified, then press the right Function button.
The 2-on-1 copy layout screen is displayed.
4. Use the
button to select the layout, then press the OK button.The print settings screen is displayed. To return to the Copy standby screen, press the OK button again.
5. Specify the number of copies by using the + or - button.
Change the print settings as necessary.
6. Press the Color button for color copying, or the Black button for black & white copying.
The machine starts scanning the first sheet of original. After scanning is complete, the Document setting screen is displayed.
NOTE
- If you press the left Function button, only the first sheet of original is copied.
7. Remove the first sheet of original from the Platen Glass, then load the second sheet of original on the Platen Glass.
8. Press the OK button.
The machine starts scanning the second sheet of original and copying.
NOTE
- This copy menu can be used in combination with Two-sided copy. If you use this copy menu in combination, you can copy four original pages on one sheet of paper. In this case, two original pages are copied on each side of paper. When you use this copy menu in combination, select 2-sided in 2-sided on the print settings screen. As the Document setting screen is displayed after scanning the second sheet of original is complete, follow the on-screen instructions to scan the third and fourth sheet of original. For details on Two-sided copy, refer to [ Copying onto Both Sides of the Paper (Two-sided copy) ].
- If Device memory is full. Cannot continue process. appears on the LCD when scanning, set the print quality to Standard or reduce the number of sheets of documents, then try copying again. If the problem is not resolved, set the print quality to Fast and try copying again.
- Copying Four Pages to Fit onto a Single Page (4-on-1 copy)
You can copy four original pages onto a single sheet of paper by reducing each image. Four different layouts are available.
1. Display the Copy menu screen.
2. Load paper.
3. Select  4-on-1 copy, then press the OK button.
The default setting for 4-on-1 copy is displayed.
4. Confirm the instruction on the LCD, then press the OK button.
The Copy standby screen is displayed.
NOTE
- You can specify the layout. To specify the layout, follow the procedure below.
1. Press the right Function button on the Copy standby screen.
The print settings screen is displayed.
2. Use the
button to select Layout.3. Make sure that 4-on-1 copy is specified, then press the right Function button.
The 4-on-1 copy layout screen is displayed.
4. Use the
button to select the layout, then press the OK button.The print settings screen is displayed. To return to the Copy standby screen, press the OK button again.
5. Specify the number of copies by using the + or - button.
Change the print settings as necessary.
6. Press the Color button for color copying, or the Black button for black & white copying.
The machine starts scanning the first sheet of original. After scanning is complete, the Document setting screen is displayed.
NOTE
- If you press the left Function button, only the first sheet of original is copied.
7. Remove the first sheet of original from the Platen Glass, then load the second sheet of original on the Platen Glass.
8. Press the OK button.
The machine starts scanning the second sheet of original. After scanning is complete, the Document setting screen is displayed.
NOTE
- If you press the left Function button, the first sheet of original and second sheet are copied.
9. Scan the third sheet of original and the fourth sheet as well as in step 7 and 8.
After scanning the fourth sheet of original is complete, the machine starts copying.
NOTE
- This copy menu can be used in combination with Two-sided copy. If you use this copy menu in combination, you can copy eight original pages on one sheet of paper. In this case, four original pages are copied on each side of paper. When you use this copy menu in combination, select 2-sided in 2-sided on the print settings screen. As the Document setting screen is displayed after scanning the fourth sheet of original is complete, follow the on-screen instructions to scan the other sheet of original. For details on Two-sided copy, refer to [ Copying onto Both Sides of the Paper (Two-sided copy) ].
- If Device memory is full. Cannot continue process. appears on the LCD when scanning, set the print quality to Standard or reduce the number of sheets of documents, then try copying again. If the problem is not resolved, set the print quality to Fast and try copying again.
- Copying without Borders (Borderless copy)
You can copy images so that they fill the entire page without borders.
1. Display the Copy menu screen.
2. Load paper.
3. Select  Borderless copy, then press the OK button.
4. Specify the number of copies by using the + or - button.
Change the print settings as necessary.
5. Press the Color button for color copying, or the Black button for black & white copying.
The machine starts copying.
NOTE
- Slight cropping may occur at the edges since the copied image is enlarged to fill the whole page. You can change the width to be cropped from the borders of the original image as needed. However, the cropped area will be larger if the extension amount is large.
- For details on the paper size and the media type available for borderless copying, see [ Printing Area ]
- Copying Thick Originals Such as Books (Frame erase copy)
When copying thick originals such as books, you can make a copy without black margins around the image and gutter shadows. Using this function, you can reduce unnecessary ink consumption.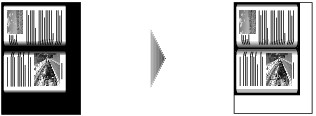
1. Display the Copy menu screen.
2. Load paper.
3. Select  Frame erase copy, then press the OK button.
4. Specify the number of copies by using the + or - button.
Change the print settings as necessary.
5. Press the Color button for color copying, or the Black button for black & white copying.
The machine starts copying.
NOTE
- Close the Document Cover.
- There may be a narrow black margin that appears around the image. This function removes the dark margins only. If a scanned book is too thin or when the machine is used near a window or in a bright environment, a faint black frame may remain. Also, if the color of an original is dark, the machine cannot distinguish the document color from the shadow and this may cause slight cropping or a shadow on the crease.
- When the Copy standby screen is displayed, pressing the center Function button allows you to preview an image of the printout on the preview screen.
- Copying the Label Side of Disc
Copy the label of an existing BD/DVD/CD and print it on a printable disc.
IMPORTANT
- You cannot print on 3.15 inches / 8 cm printable discs.
- Do not attach the Disc Tray until the message asking you to set the printable disc is displayed. Doing so can damage the machine.
1. Display the Copy menu screen.
2. Select  Disc label, then use the OK button to confirm the selection.
The print area setting screen is displayed.
3. Use the button to select Outer circle or Inner circle and use the button to change the print area.
4. Use the OK button to confirm the selection.
NOTE
- Measure the outer and inner diameters of the printing surface of the printable disc and make sure you set a value smaller than the measured value for the outer diameter, and a value larger than the measured value for the inner diameter.
- For information on printable discs, contact their manufacturers.
5. Use the button to select Recommended disc or Other disc, then use the OK button to confirm the selection.
NOTE
- If your printable disc is the recommended disc, specify Recommended disc for the suitable density printing. If not, specify Other disc.
6. Load the copy source BD/DVD/CD on the Platen Glass, then use the OK button to go to the next step.
The disc label standby screen is displayed.
IMPORTANT
- Be sure to load the copy source BD/DVD/CD with its label side down on the center of the Platen Glass. If you load it near the edge of the Platen Glass, part of the image may be cut off.
7. Use the Color button for color copying, or the Black button for black & white copying.
8. Confirm the message, then set the printable disc.
Use the left Function button to see how to set the printable disc.
9. Use the OK button to start copying.
The machine starts copying.
NOTE
- Do not see the light source directly while copying is in progress.
- Use the Stop button to cancel copying.
- After printing, allow the printing surface of the disc to dry naturally. Do not use hairdryers or expose the disc to direct sunlight to dry the ink. Do not touch the printing surface until the ink has dried.
- To keep the print quality at an optimal level, it is recommended to stop printing discs once every ten discs when printing more than ten discs continuously. To stop the printing operation, detach the Disc Tray from the printer, then close the Inner Cover. After approximately three minutes have elapsed, open the Inner Cover, attach the Disc Tray to the printer, then resume printing.
Check 6: Is printing performed beyond the recommended printing area?
If you are printing beyond the recommended printing area of your printing paper, the lower edge of the paper may become stained with ink.
Resize your original document in your application software.
To ensure the best print quality, the machine allows a margin along each edge of media. The actual printable area will be the area inside these margins.
Recommended printing area :  Canon recommends that you print within this area.
Printable area  : The area where it is possible to print.
However, printing in this area can affect the print quality or the paper feed precision.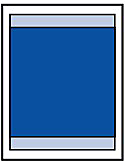
NOTE
Borderless Printing
- By selecting Borderless Printing option, you can make prints with no margins.
- When performing Borderless Printing, slight cropping may occur at the edges since the printed image is enlarged to fill the whole page.
- Duplex printing is not available when performing Borderless Printing.
- For Borderless Printing, use the following paper:
- Glossy Photo Paper "Everyday Use" GP-501
- Photo Paper Glossy GP-502
- Photo Paper Plus Semi-gloss SG-201
- Photo Paper Pro Platinum PT-101
- Photo Paper Plus Glossy II PP-201
- Matte Photo Paper MP-101
Performing Borderless Printing on any other type of paper may substantially reduce printing quality and/or result in printouts with altered color hues.
Borderless Printing on plain paper may result in printouts with reduced quality. Use them only for test printing. You can perform Borderless Printing on plain paper only when printing from your computer.
- Borderless Printing is not available for legal, A5, or B5 sized paper, or envelopes.
- Depending on the type of paper, Borderless Printing may reduce the print quality at the top and bottom edges of the paper or cause these parts to become smudged.
With performing Automatic Duplex Printing and Duplex (Two-sided) Copying, the printable area will be 0.08 inches / 2 mm smaller at the top margin.
When performing borderless copying or borderless printing from a printed photo, you can specify the amount of images that extends off the paper by Extended copy amount in Print settings.
Letter, Legal
| Size | Printable Area (width x height) |
| Letter | 8.00 x 10.69 inches / 203.2 x 271.4 mm |
| Legal* | 8.00 x 13.69 inches / 203.2 x 347.6 mm |
* This page size can be used only when printing from your computer.
Recommended printing area Printable area
Envelopes
| Size | Recommended Printing Area (width x height) |
| European DL* | 4.06 x 7.07 inches / 103.2 x 179.6 mm |
| US Comm. Env. #10* | 3.86 x 7.91 inches / 98.0 x 200.9 mm |
* This page size can be used only when printing from your computer.
Recommended printing area
Other Sizes than Letter, Legal, Envelopes
| Size | Printable Area (width x height) |
| A5 | 5.56 x 7.95 inches / 141.2 x 202.0 mm |
| A4 | 8.00 x 11.38 inches / 203.2 x 289.0 mm |
| B5 | 6.90 x 9.80 inches / 175.2 x 249.0 mm |
| 4" x 6" / 10 x 15 cm | 3.73 x 5.69 inches / 94.8 x 144.4 mm |
| 4" x 8" / 10 x 20 cm* | 3.73 x 7.69 inches / 94.8 x 195.2 mm |
| 5" x 7" / 13 x 18 cm* | 4.73 x 6.69 inches / 120.2 x 169.8 mm |
| 8" x 10" / 20 x 25 cm | 7.73 x 9.69 inches / 196.4 x 246.0 mm |
| Wide | 3.73 x 6.80 inches / 94.8 x 172.6 mm |
* This page size can be used only when printing from your computer.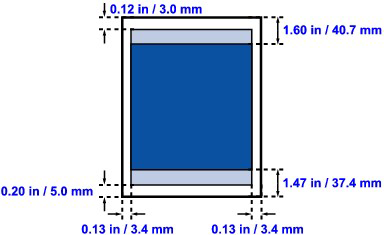
Recommended printing area Printable area
Printable Discs
The printing area of the printable disc is the area excluding the 0.03 inches / 1 mm area from the internal and external diameters of the label.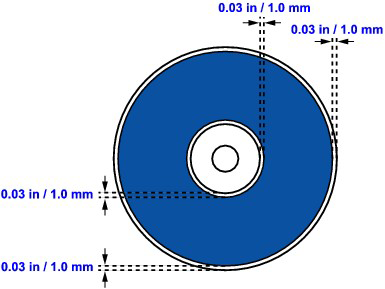
Recommended printing area
Check 7: Is the Platen Glass dirty?
Clean the Platen Glass.
IMPORTANT
- Be sure to turn off the power and disconnect the power plug before cleaning the machine.
With a clean, soft, lint-free cloth, wipe the Platen Glass (A) and the inner side of the Document Cover (white sheet) (B) gently. Be sure not to leave any residue, especially on the Platen Glass.
IMPORTANT
- The inner side of the Document Cover (white sheet) (B) is easily damaged, so wipe it gently.
Check 8: Is the Paper Feed Roller dirty?
Clean the Paper Feed Roller.
-> [ Cleaning the Paper Feed Roller ]
NOTE
- Cleaning the Paper Feed Roller will wear the roller, so perform this procedure only when necessary.
Check 9: Is the inside of the machine dirty?
When performing duplex printing, the inside of the machine may become stained with ink, causing the printout to become smudged.
Perform the Bottom Plate Cleaning to clean the inside of the machine.
NOTE
- To prevent the inside of the machine from stains, set the paper size correctly.
Cleaning the Inside of the Machine (Bottom Plate Cleaning)
This section explains how to clean the inside of the machine. If the inside of the machine becomes dirty, printed paper may get dirty, so we recommend performing cleaning regularly.IMPORTANT
Do not perform any other operations while performing the Bottom Plate Cleaning.
1. Make sure that the machine is turned on.
2. Open the Paper Output Tray gently, and open the Output Tray Extension.
3. Select  Setup on the HOME screen.
4. Select  Maintenance, then press the OK button.
The Maintenance screen is displayed.
5. Use the button to select Bottom plate cleaning, then press the OK button.
The confirmation screen is displayed.
6. Use the button to select Yes, then press the OK button.
7. Remove any paper from the Rear Tray following the on-screen instructions.
8. Fold a single sheet of A4 or Letter-sized plain paper in half widthwise, then unfold the paper following the on-screen instructions.
9. Load this and only this sheet of paper on the Rear Tray with the open side facing to the front following the on-screen instructions.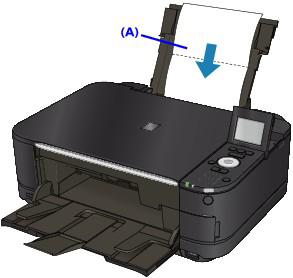
(A) Load the paper after unfolding it.
The paper cleans the inside of the machine as it feeds through the machine.
Check the folded part of the ejected paper. If it is smudged with ink, perform Bottom Plate Cleaning again.
If the problem is not resolved after performing cleaning again, the protrusions inside the machine may be stained. Clean them according to instructions.
-> [ Cleaning the Protrusions inside the Machine ]
NOTE
- When performing Bottom Plate Cleaning again, be sure to use a new sheet of paper.
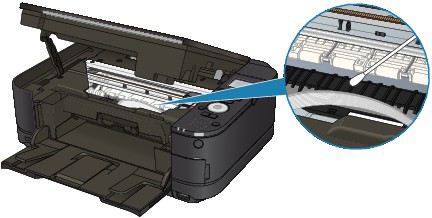
Cleaning the Protrusions inside the Machine
If protrusions inside the machine are stained, wipe off any ink from the protrusions using a cotton swab or the like.IMPORTANT
- Be sure to turn off the power and disconnect the power plug before cleaning the machine.
Check 10: Set Ink Drying Wait Time longer
Doing so gives the printed surface enough time to dry so that paper smudged and scratched are prevented.
1. Make sure that the machine is turned on.
2. Open the printer driver setup window.
3. Click the Maintenance tab and then Custom Settings.
4. Drag the Ink Drying Wait Time slide bar to set the wait time, and then click Send.
5. Confirm the message and click OK.
1. Make sure that the machine is turned on.
2. Open the Canon IJ Printer Utility.
3. Select Custom Settings in the pop-up menu.
4. Drag the Ink Drying Wait Time slide bar to set the wait time, and then click Send.
5. Confirm the message and click OK.
Check 11: Is the paper scratched by other loaded paper?
Depending on the media type, the paper may be scratched by other loaded paper when feeding from the Rear Tray. In this case, load one sheet at a time.
Applicable Models
- PIXMA MG5240
- PIXMA MG5250