Setting the Wireless LAN Manually
FAQ ID: 8201307300
Release date: 31 October 2011
Solution
Switching the Connection Method to Wireless LAN
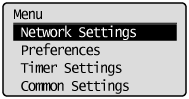
1. Press [ ] (Menu).
2. Select <Network Settings> with [  ] or [
  ], and then press [OK].
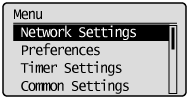

The screen below is displayed for approximately 5 seconds. (You do not need to turn the machine OFF/ON in this step.)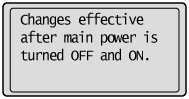
3. Select <Select Wired/Wireless LAN> using [ ] or [ ], and then press [OK].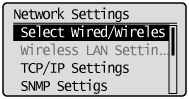
4. Select <Wireless LAN> using [ ] or [ ], and then press [OK].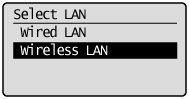
5. Turns the machine OFF/ON when the following screen disappears.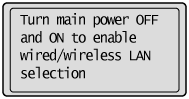
It is necessary to turn the machine OFF/ON to activate the settings.
Turn OFF the machine and wait for at least 10 seconds before turning it back ON.
MF8380Cdw/MF8360Cdn/MF8340Cdn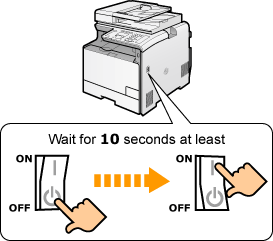
MF8080Cw/MF8040Cn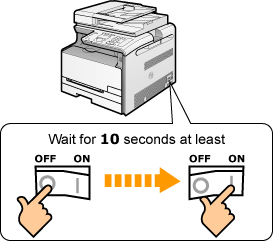
Setting by Manually Selecting an Access Point
From the list of access points searched by the machine, select a wireless LAN router or an access point to be connected and enter a network key for connection.NOTE
- Selecting Access Point
For selecting access points, WEP 802.11 authentication system is set to <Open System>, while WPA/WPA2 encryption method is set to <Auto> (either AES-CCMP or TKIP).
If you want to set 802.11 authentication system to <Shared Key> or the WPA/WPA2 encryption method to <AES-CCMP>, manually enter the value.
1. Write down the following information required for the settings. The information is needed in steps 8 through 10.
* For more information on how to check, refer to the instruction manual of the wireless LAN router or access point, or contact the manufacturer.  SSID
SSID
* It may be indicated as access point name or network name.
Write down all if there is multiple SSID.
It is used when selecting an access point in Step 8.Network Key
* It may be indicated as encryption key, WEP key, WPA/WPA2 passphrase, PSK or pre-shared key.
What you write down here is the network key that is currently specified for the wireless LAN router or access point.
It is used when selecting an access point in Step 10.
- Number of network key characters (digits)
Select the entry format that matches the number of network key characters (digits) in Step 9.
NOTE
- Checking for SSID and Network Keys
There are cases when the defaults are written on the body of the wireless LAN router or access point. If the settings for the wireless LAN router or access point have been changed or are not written, or if you are not sure of the settings, see "Checking the Access Point Name or Network Key (Windows)."
2. Press [ ] (Menu).
3. Select <Network Settings> using [  ] or [
  ] and press [OK].
When the system manager ID and system manager PIN are specified, use the numeric keys to enter the ID and number, and then press [  ] (Log In/Out).
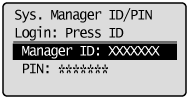
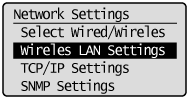
4. Select <Wireless LAN Settings> using [ ] or [ ] and press [OK].
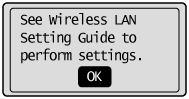
5. Press [OK].
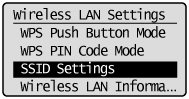
6. Select <SSID Settings> using [ ] or [ ] and press [OK].
7. Select <Select Access Point> using [ ] or [ ] and press [OK].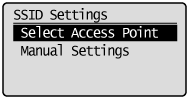


* When the <Cannot find access point.> is displayed, "Onscreen Messages" in the e-Manual.
8. Select the matched SSID that you have written down in step 1. using [ ] or [ ], and then press [OK].
If the multiple matched SSID are displayed, select the one that is displayed at the top (a stronger signal).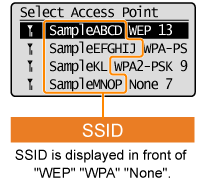
 Ex.)
Ex.)  SampleNOP WPA2-PSK 9
| Signal strength (Strong) |
| SampleNOP | SSID |
| WPA2-PSK | Types of encryption |
| 9 | Channel |
* When you cannot find an access point you want to connect, see "Checking the Access Point Name or Network Key (Windows)."
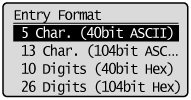
9. Select the entry format that matches the number of network key characters (digits) that you have written down in step 1. using [ ] or [ ], and then press [OK].
Either of the following screens is displayed.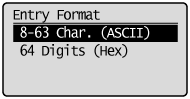
10. Enter the network key that you have written down in step 1.
- ASCII text
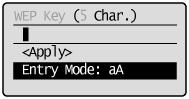
(1) Press [  ] (Tone), and then select <Entry Mode>.
(2) Enter the network key.
* You can enter it using the numeric keys.
(3) Select <Apply> using [ ] or [ ], and then press [OK].
- Hexadecimal
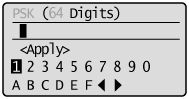
(1) Enter the network key.
* Select the characters using [  ] or [
  ], and then press [OK] to enter.
(2) Select <Apply> using [ ] or [ ], and then press [OK].
11. Select <Yes> using [ ] and press [OK].


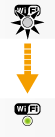
12. Make sure the Wi-Fi indicator blinks.
When the wireless LAN router or access point is detected, the Wi-Fi indicator blinks.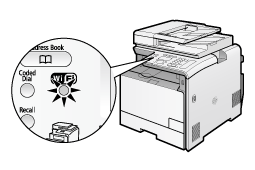

The screen below is displayed for approximately 2 seconds, and then the Wi-Fi indicator lights up.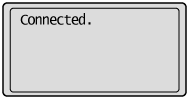
* If an error message appears, press [OK] to close the screen, check to make sure that the network key is correct, and follow the procedure again from step 5.
If you cannot connect to the access point after retrying, see "Onscreen Messages" in the e-Manual.
13. Wait until the machine sets the IP address automatically (approx. 2 min).
If you want to set the IP address manually, see "Setting the IP Address."
Checking the Wireless LAN Setting is Completed
1. Press [ ] (Status Monitor/Cancel).
2. Select <Network Information> using [ ] or [ ], and then press [OK].

3. Select your network type.
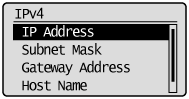
To check the IPv4 address settings
- Select <IPv4> using [ ] or [ ], and then press [OK].

- Select the setting to check using [ ] or [ ], and then press [OK].
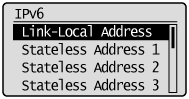
To check the IPv6 address settings
- Select <IPv6> using [ ] or [ ], and then press [OK].

- Select the setting to check using [ ] or [ ], and then press [OK].
4. Take note of the IP address.
IPv4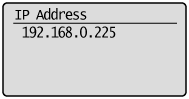
IPv6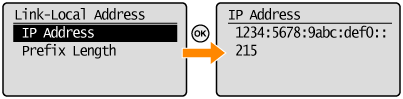
5. Press [ ] (Status Monitor/Cancel) to close the screen.
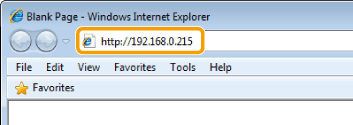
6. Start the Web browser of a computer which is connected to a network.
7. Enter "http://IP address of the machine/" in the address field and press the [ENTER] key on the keyboard.
The <IP address of the machine> is the address noted in step 4 above.
Example: http://192.168.0.215/
8. Check that the screen of the Remote UI is displayed.
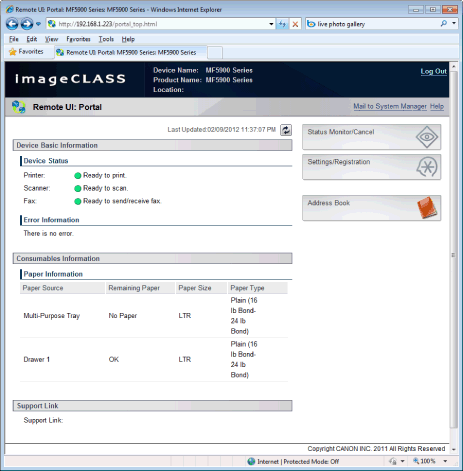
NOTE
When Remote UI is not displayed, check the following.
- Whether the computer and hub are connected using a LAN cable
- Whether the <Remote UI On/Off> is set to <On>
Applicable Models
- i-SENSYS MF8040Cn
- i-SENSYS MF8080Cw
- i-SENSYS MF8340Cdn
- i-SENSYS MF8360Cdn
- i-SENSYS MF8380Cdw